Vue 是一款用于构建用户界面的 JavaScript 框架。它基于标准 HTML、CSS 和 JavaScript 构建,并提供了一套声明式的、组件化的编程模型,可以高效地开发用户界面,是目前生产环境中使用最广泛的 JavaScript 框架之一

之前和很多位前端合作开发过项目,对 Vue 有一点了解,今天就用 Vue + Element UI 来实际开发项目
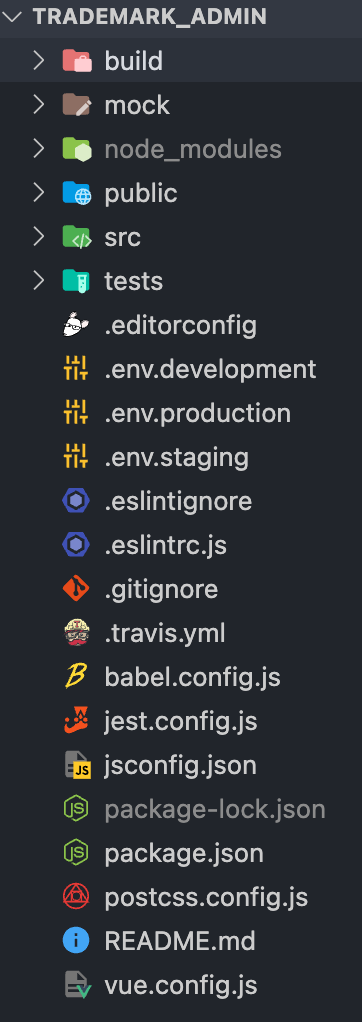
从现成的 Vue Element Admin 新建项目,目录如下:

使用到的都是目前常见的工具:代码检查、语法兼容、单元测试、样式管理等
去路由文件 src/router/index.js 建好菜单,选几个适合的 icon,就开始开发业务了:

搜索
一般我们页面上方都是搜索的筛选项,新建个盒子写上面,加入常见的输入框和下拉框
listQuery是查询时传给后端的参数
<div class="app-container">
    <div class="filter-container">
        <el-input v-model="listQuery.name" placeholder="姓名" style="width: 150px;" class="filter-item" @keyup.enter.native="handleFilter" />
        <el-select v-model="listQuery.company_id" placeholder="公司" clearable filterable class="filter-item" style="width: 150px;margin-left: 10px;">
            <el-option v-for="item in companyOptions" :key="item.id" :label="item.name" :value="item.id" />
        </el-select>
    </div>
</div>
事件
@keyup.enter.native:为了操作方便,在输入框打完字后按回车就能查询,不需要再移动鼠标去点击按钮
下拉框的选项是后端直接提供的不分页的接口:
单个引入接口
import { getAllCompany } from '@/api/member'
export default {
    data() {
        return {
            companyOptions: null
        }
    },
    created() {
        this.getCompanyOptions()
    },
    methods: {
        getCompanyOptions() {
            getAllCompany().then(response => {
                this.companyOptions = response.data
            })
        }
    }
}
再加上 2 个按钮,第一部分就完成了:

<el-button class="filter-item" style="margin-left: 10px;" type="primary" icon="el-icon-search" @click="handleFilter">搜索</el-button>
<script>
fetchData() {
    // 调接口
},
handleFilter() {
    this.fetchData()
}
</script>
表格
然后是中间的正文,<el-table>
| 属性 | 意义 |
|---|---|
v-loading |
加载效果 |
:data |
绑定后端数据 |
highlight-current-row |
鼠标 hover 效果 |
border |
边框 |
@cell-click |
单元格点击事件 |
<el-table v-loading="listLoading" :data="list" element-loading-text="Loading" border fit highlight-current-row @cell-click="handleCellClick" style="font-size: small">
    <el-table-column label="ID" width="70" align="center">
        <template slot-scope="scope">
            {{ scope.row.id }}
        </template>
    </el-table-column>
    <el-table-column label="姓名" width="100" align="center">
        <template slot-scope="scope">
            {{ scope.row.name }}
        </template>
    </el-table-column>
</el-table>
为了美观还加了些 <el-tag> <i> 等
上下排列的样式
display: flex;flex-flow: column;text-align: left;
单元格点击方法是统一触发的,需要自己判断是哪一列:
需要实现
电话字段需要默认展示中间带 号的,点击一次显示不带 的,第二次复制到剪贴板
handleCellClick(row, column, cell, event) {
    if (column.label === '电话') {
        row.hidden_mobile = row.mobile
        if (row.copy_status) {
            this.$copyText(row.mobile).then(() => {
                this.$message({
                    message: '复制成功:' + row.mobile,
                    type: 'success'
                })
            })
        }
        row.copy_status = true
    }
    if (column.label === '跟进动态') {
        // TODO
    }
}
需要用到
npm install vue-clipboard2,并在 main.js 中引入import VueClipboard from 'vue-clipboard2'
由于我更熟悉后端字符串处理,就分开传了 2 个值,处理前 hidden_mobile 与处理后的 mobile
分页
分页就用 Element UI 的了,自己新建一个组件:
src/components/Pagination/index.vue<template>
    <div :class="{'hidden':hidden}" class="pagination-container">
        <el-pagination :background="background" :current-page.sync="currentPage" :page-size.sync="pageSize" :layout="layout" :page-sizes="pageSizes" :total="total" v-bind="$attrs" @size-change="handleSizeChange" @current-change="handleCurrentChange"/>
    </div>
</template>
<style scoped>
.pagination-container {
    background: #fff;
    padding: 32px 16px;
}
.pagination-container.hidden {
    display: none;
}
</style>
引入这个分页组件:
<pagination v-show="total > 0" :total="total" :page.sync="listQuery.page" :limit.sync="listQuery.limit" @pagination="fetchData" />把相关字段准备好:
import Pagination from '@/components/Pagination'
export default {
    components: { Pagination },
    data() {
        return {
            list: null,
            total: 0,
            listLoading: true,
            listQuery: {
                page: 1,
                limit: 20,
                name: undefined,
                mobile: undefined
            }
        }
    }
}
完成上面空着的方法:
import { getSaleList } from '@/api/member'
fetchData() {
    this.listLoading = true
    getSaleList(this.listQuery).then(response => {
        this.list = response.data.items
        this.total = response.data.total
        this.listLoading = false
    })
},
handleFilter() {
    this.listQuery.page = 1 // 有分页后加上页数
}
自动搜索:
created() {
    this.fetchData()
}